git clone git@github.com:gentics/mesh-react-example.git
git checkout guide-step-1Table of Contents
Intro
In this guide you will learn how to adapt a React application to use Gentics Mesh.
The application we will use is very basic and only consists of three different views which form a vehicle inventory.

The welcome page contains just a basic intro text and the navigation. The category overview page displays a list entries of the category. Initially we only display hardcoded contents and thus only the aircrafts category is displayed which contains a single vehicle. The last page provides the vehicle view of the selected vehicle.
Next Steps:
-
We will prepare the frontend app and set the views up.
-
Get Gentics Mesh ready and create our schemas.
-
Add contents and update the app to load JSON from the server.
Building Blocks / Domain Model
In our app we use a few different data elements.
Each Vehicle has a name, description, SKU, price, weight, stockLevel and image field. Each Category with a name field can list multiple Vehicles.
Step 1 - Frontend App
The guide-step-1 branch of the mesh-react-example repository contains the example react app. The app was created using create-react-app. Bootstrap and react-router-dom were added along with the basic components and css which are needed for the views.
Initially the content in the example is hard coded and not dynamic. The connection to Gentics Mesh will be added after a short introduction of the example code.
Sources:
-
App.jsx- Setup ofreact-router-domand rendering of navigation and content area. -
Category.jsx- Renders the vehicle overview which contains teasers for each vehicle in the category. -
Content.jsx- Handles the routing between category overview and vehicle detail view. -
Navigation.jsx- Renders the navigation which consists of all categories. -
Vehicle.jsx- Renders the detail view of a vehicle. -
WelcomeScreen.jsx- Renders the welcome screen content.
Routing
The Content.jsx handles the dynamic routing. For paths other than / it will render the WebrootContent component. This component examines the current location.pathname to either render a Vehicle or a Category component. The content JSON data for each case is passed along.
Navigation
The Navigation.jsx renders the navigation by iterating over the response object. The layout of this JSON object already corresponds to the data which we will later on load from Gentics Mesh.
At this stage only one category will be listed.
{
    project: {
        rootNode: {
            children: {
                elements: [{
                    path:  "/aircrafts",
                    fields: {
                        name: "Aircrafts"
                    }
                }]
            }
        }
    }
}
return (
<nav className="navbar navbar-default">
<div className="container-fluid">
<div className="navbar-header">
<Link className="navbar-brand" to="/">Home</Link>
</div>
<ul className="nav navbar-nav">
{navResponse && navResponse.project.rootNode.children.elements.map(category => (
<NavElement key={category.uuid} category={category} />
))}
</ul>
</div>
</nav>
)Category View
The Category.jsx iterates over all children of the category to render the list view.
{
    fields: {
        name: "Aircraft"
    },
    children: {
        elements: [{
            path: "/aircrafts/space-shuttle",
            fields: {
                vehicleImage: { path: "/images/sts.jpg" },
                name: "Space shuttle",
                SKU: 3,
                price: 192000000000,
                weight: 22700
            }
        }]
    }
}
Vehicle View
The Vehicle.jsx will use the hardcoded JSON data which was entered in the Content.jsx to render the detail view.
At this stage only the Space Shuttle will be listed in the Aircraft category.
{
    fields: {
        name: "Space Shuttle",
        SKU: 3,
        price: 192000000000,
        weight: 22700,
        description: "The Space Shuttle was a partially reusable low Earth orbital spacecraft system operated by the U.S. National Aeronautics and Space Administration (NASA).",
        vehicleImage: { path: "/images/sts.jpg" }
    }
}
Step 2 - Gentics Mesh
Once the container has been setup, start the docker container and login http://localhost:8080 using the user admin and the password that was auto-generated and printed on first startup.
docker run -v mesh-graphdb:/graphdb -v mesh-uploads:/uploads -p 8080:8080 gentics/meshYou can also skip Step 3 if you want and use our demo instance which already contains the demo content.
docker run -p 8080:8080 gentics/mesh-demoStep 3 - Schemas
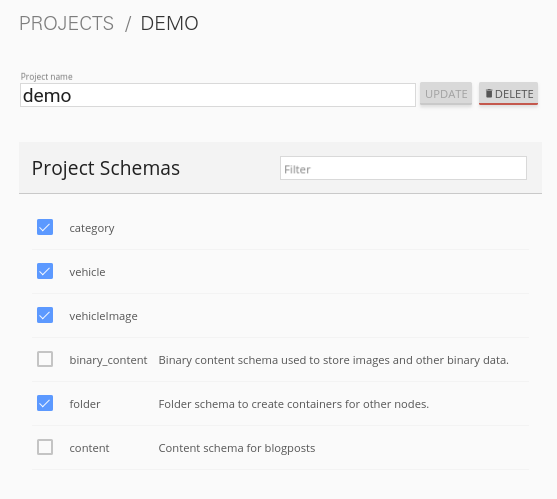
We need three different schemas for our inventory app. A Vehicle, Category and VehicleImage schema.
The schema controls what fields can be used in the content.
Possible field types are: string, boolean, number date html binary, list, node, micronode.
A content of a specific Schema is called a Node. Nodes can be nested, translated, moved, deleted, created, tagged. They are the central data element in Gentics Mesh.
You can create the three schemas in the admin area by using the provides JSON in the JSON Editor.
VehicleImage
The VehicleImage nodes store the image data for each Vehicle. Additional fields could be added to store copyright information of altText data.
The name identifies the schema in the system.
The displayField controls what field should be used to display in the UI node list. In our case the name will be used to be displayed.
The segmentField controls which field should be used to identify the node for the webroot API. Nodes can be nested in each other and thus each node can provide a segment for path. This way it is possible to load nodes via a path resolving system.
For the images the binary field will provide the segment. This way the filename of the uploaded binary will be used. The image will be loadable via the /images/sts.jpg path.
The container property controls whether the node can contain children. For images this is not needed but folders would need to be containers.
{
	"name": "vehicleImage",
	"displayField": "name",
	"segmentField": "image",
	"container": false,
	"fields": [
		{
			"name": "name",
			"label": "Name",
			"required": true,
			"type": "string"
		},
		{
			"name": "image",
			"label": "Image",
			"required": false,
			"type": "binary"
		}
	]
}
Vehicle
Next the Vehicle schema needs to be created. It contains the needed fields to store the information of a vehicle.
Each vehicle has a name, weight, SKU, price, stockLevel, description, vehicleImage.
The vehicleImage field of type node can store references to VehicleImage nodes. Once we create a vehicle we will use this field to pick a previously uploaded vehicle image.
{
	"name": "vehicle",
	"displayField": "name",
	"segmentField": "slug",
	"container": false,
	"fields": [
		{
			"name": "slug",
			"label": "Slug",
			"required": true,
			"type": "string"
		},
		{
			"name": "name",
			"label": "Name",
			"required": true,
			"type": "string"
		},
		{
			"name": "weight",
			"label": "Weight",
			"required": false,
			"type": "number"
		},
		{
			"name": "SKU",
			"label": "Stock Keeping Unit",
			"required": false,
			"type": "number"
		},
		{
			"name": "price",
			"label": "Price",
			"required": false,
			"type": "number"
		},
		{
			"name": "stocklevel",
			"label": "Stock Level",
			"required": false,
			"type": "number"
		},
		{
			"name": "description",
			"label": "Description",
			"required": false,
			"type": "html"
		},
		{
			"name": "vehicleImage",
			"label": "Vehicle Image",
			"required": false,
			"type": "node",
			"allow": [
				"vehicleImage"
			]
		}
	]
}
Category
Finally our project needs also to have categories for our vehicles. A category also acts as a folder and thus the container flag is set.
{
	"name": "category",
	"displayField": "name",
	"segmentField": "slug",
	"container": true,
	"fields": [
		{
			"name": "name",
			"label": "Name",
			"required": true,
			"type": "string"
		},
		{
			"name": "slug",
			"label": "Slug",
			"required": true,
			"type": "string"
		}
	]
}
Step 4 - Contents
Next we will add our content to Gentics Mesh. For this we need to create a new project, link the created schemas to it. Finally we create some contents.
Project
Open the admin menu and create a new project called demo.
The previously created schemas category,vehicle, vehicleImage must be linked to the project.
Content
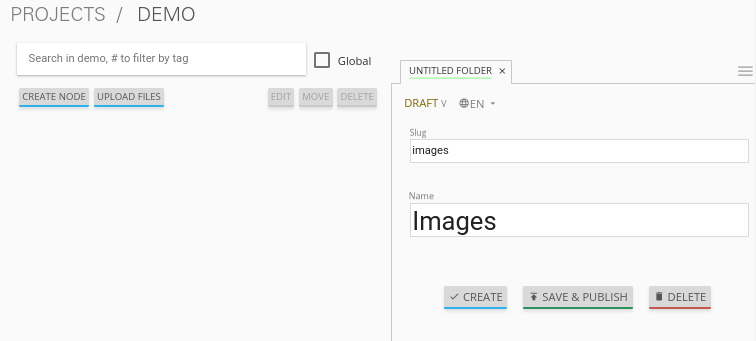
Close the admin area and open the Demo project.
Images folder
Create a new folder called images.
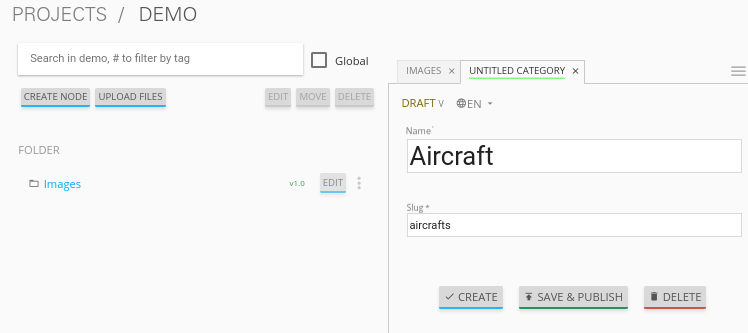
Aircrafts category
Next we create the Aircrafts category node. Make sure to use the category schema type.
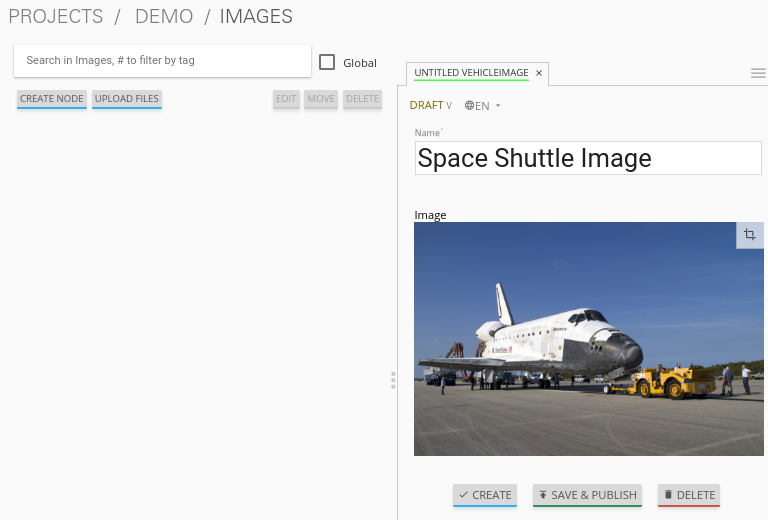
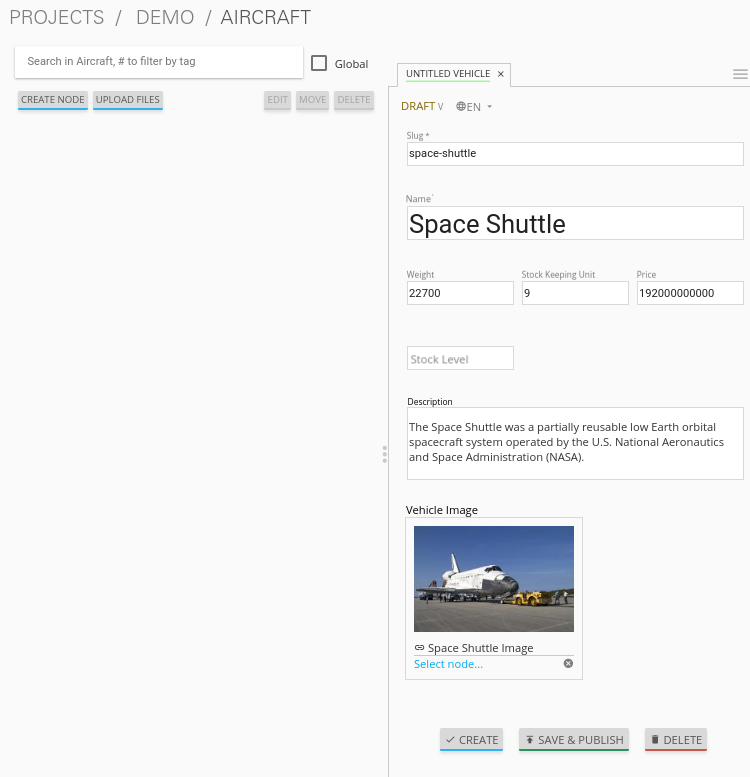
Space Shuttle image
Open the Images folder and create a new VehicleImage node. You can download the space shuttle image.
Space Shuttle vehicle
Now it is time to create our vehicle. Open the Aircraft category and create a new vehicle node.
Permissions
Before we can read our data via GraphQL we need to assign the read permission to the newly created project. We need to apply the read permission recusively so that it will be applied to all created nodes. Otherwise we would need to deal with authentication in our frontend app.
By default all unauthenticated requests to Gentics Mesh will fall back to use the anonymous user and the assigned anonymous role. This is very useful if you just want to serve data publicly without any authentication. This mechanism can of course be turned off in the mesh.yml file.
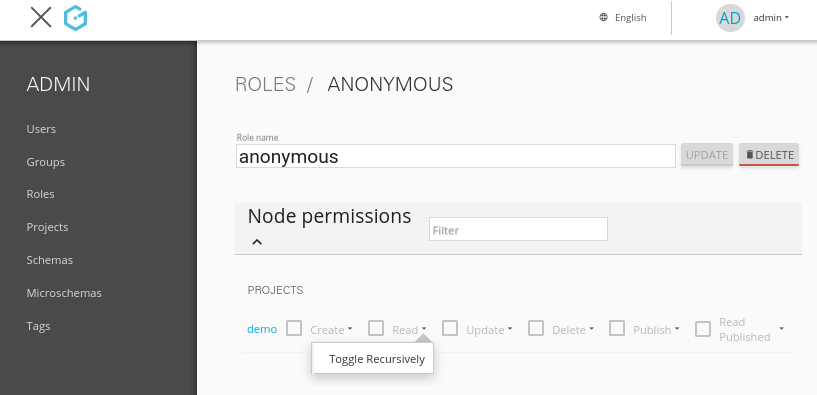
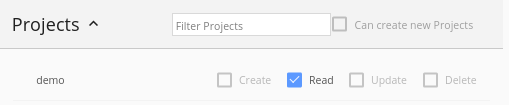
Additionally we also need to grant read permission on the demo project itself.
Step 5 - GraphQL
If everything went well you should now be able to load the space shuttle vehicle information via GraphQL.
The GraphQL API of Gentics Mesh provides you with a great option to load the structured content you have just entered.
Contents
Open http://localhost:8080/api/v2/demo/graphql/browser and check whether you get the data.
{
node(path: "/aircrafts/space-shuttle") {
fields {
... on vehicle {
name
weight
vehicleImage {
path
fields {
... on vehicleImage {
image {
dominantColor
}
}
}
}
}
}
}
}
Via GraphQL it is possible to load the JSON data for the content we have just entered. It is also possible to directly load related data. A good example for this is the loading of node references. In the example the vehicleImage will be loaded.
Navigation
The top navigation of our app is generated by listing all categories. We can use GraphQL to load the tree structure and list all child nodes of the project which match the category schema.
query Navigation {
project {
rootNode {
children(filter: {schema: {is: category}}) {
elements {
uuid
path
fields {
... on category {
name
}
}
}
}
}
}
}
Step 6 - Integration
Now that we have added our content and know how to fetch the data we can update the React app to utilize the GraphQL API to load the contents.
You can also directly checkout the updated sources from the guide-step-2 branch which contain all needed changes.
|
API
The interaction with the Gentics Mesh API is defined in the api.js file. The getNavigation function will invoke a GraphQL query which loads the navigation information.
Loading vehicle information and category overview data will be done using the useWebroot function.
GraphQL fragments are used to structure the query and are generally useful when loading multi-level navigations.
| In this example we are using hooks. If you want to know more, we recommend reading the official introduction. |
| Define the needed information per level of your navigation and re-use the fragment to keep the GraphQL query well-arranged. |
Add the api.js file to your src directory.
|
api.js
import {useState, useEffect} from 'react';

export async function getNavigation() {
  return graphQl(`query Navigation {
    project {
      rootNode {
        children(filter: {schema: {is: category}}) {
          elements {
            uuid
            path
            fields {
              ... on category {
                name
              }
            }
          }
        }
      }
    }
  }`);
}

export function useWebroot(path) {
  return usePromise(() => graphQl(`
  query Webroot($path: String) {
    node(path: $path) {
      schema {
        name
      }
      ...category
      ...product
    }
  }
  ${categoryFragment}
  ${productFragment}
  `, {path}).then(response => response.node), [path])
}

const categoryFragment = `
fragment category on Node {
  fields {
    ... on category {
      name
    }
  }
  children {
    elements {
      uuid
      path
      fields {
        ... on vehicle {
          name
          weight
          description(linkType: SHORT)
          SKU
          price
          stocklevel
          vehicleImage {
            path
          }
        }
      }
    }
  }
}`

const productFragment = `
fragment product on Node {
  fields {
    ... on vehicle {
      name
      description(linkType: SHORT)
      SKU
      price
      weight
      stocklevel
      vehicleImage {
        path
      }
    }
  }
}`

export function usePromise(promiseFn, changes) {
  const [state, setState] = useState();

  useEffect(() => {
    promiseFn().then(setState)
  }, changes)

  return state;
}

function graphQl(query, variables) {
  return post(`/demo/graphql`, { query, variables }).then(response => response.data);
}

function post(path, data) {
  return fetch(`/api/v2${path}`, {
    body: JSON.stringify(data),
    method: 'POST'
  }).then(response => response.json());
}
React Proxy
React scripts provide a great way to add API server to our development app by proxying API request.
We just need to add the proxy field to our package.json file. This way the Gentics Mesh API will also be exposed in the React App development server.
package.json
…
"proxy": "http://localhost:8080"
…| In production we could either use an nginx proxy or use CORS to utilize a different domain for our Gentics Mesh server. |
Content
In the initial app we used pre-defined routing. Paths for /aircrafts/space-shuttle would return the vehicle node and /aircrafts would return category node.
We can use the path to load contents via GraphQL. We make use of this feature to retrieve the content data that has been stored in Gentics Mesh for the pathname that the react router provides.
Add the needed import and change the way the WebrootContent data is loaded.
|
Content.jsx
import { useWebroot } from './api';Content.jsx
const WebrootContent = ({ location }) => {
  const node = useWebroot(location.pathname);
  if (!node) {
    return null;
  }
  const NodeComponent = NodeComponents[node.schema.name];
  return <NodeComponent node={node} />
}
The schema name in the GraphQL response will be used to decide which component to render. The NodeComponents object maps the schema name to the react component to be used.
const NodeComponents = {
  "category": Category,
  "vehicle": Vehicle
}
Images
Originally the Space Shuttle image was loaded from the static files folder. The webroot API can be used to load uploaded binaries directly using the path. We don’t have to lookup any uuid.
The image URL has to be changed in the Category.jsx file for the teaser view and in the detailed view within the Vehicle.jsx file.
|
Category.jsx
- <img alt="" className="img-thumbnail" src={`${vehicle.fields.vehicleImage.path}?w=328`} />
+ <img alt="" className="img-thumbnail" src={`/api/v2/demo/webroot${vehicle.fields.vehicleImage.path}?w=328`} />
Vehicle.jsx
- <img className="img-thumbnail" src={`${node.fields.vehicleImage.path}`} alt="" />
+ <img className="img-thumbnail" src={`/api/v2/demo/webroot/${node.fields.vehicleImage.path}`} alt="" />
Navigation
Loading the navigation is also straightforward. The hardcoded navResponse object is replaced by the API call.
The getNavigation function in the api.js file will load a list of all found category nodes.
| Add the import and use the api to load the navigation. |
Navigation.jsx
import { getNavigation, usePromise } from './api';Navigation.jsx
const navResponse = usePromise(() => getNavigation(), []);Conclusion
Your app should now be able to load the content from Gentics Mesh. New categories and vehicles will now directly show up in you app. You can now for example alter the schema and add extra fields which can later on be used in your app.
More guides will follow in the future which will cover:
-
In depth content modelling
-
Authentication handling with Login, registration and password reset
-
Adding a custom search which uses Elasticsearch queries to filter and sort by
-
Staging content deployments and restructuring contents using branches
-
Event handling via websocket
-
Permission handling