docker run -p 8080:8080 gentics/mesh-demoTable of Contents
Here you will find everything to get you started with Gentics Mesh.
Gentics Mesh is a headless CMS which provides developers with HTTP based API’s to accessing and manage contents.
Headless CMS vs. Regular CMS
A headless CMS just provides an API (REST/GraphQL) instead of serving or rendering the pages directly. The template handling is done in your front-end. This gives the developers the freedom to choose the technology stack they like. The CMS no longer dictates this.
Quickstart
If you don’t have much time:
-
Try the UI with login (admin/admin) for playing around with Gentics Mesh and it’s user interface.
-
Changes can be viewed in the demo front-end
-
Head over to the TL;DR section to find out everything you need to know and what makes Gentics Mesh special.
Run with docker
The easiest way to run Gentics Mesh is using docker.
Or download the jar
-
Download Gentics Mesh from https://getmesh.io/download into an empty folder
-
Start the JAR-file by executing
java -jar mesh-demo-X.X.X.jar -
Point your browser to http://localhost:8080/mesh-ui/ to reach the Gentics Mesh user interface (use
admin/admin
TL;DR
Intro
-
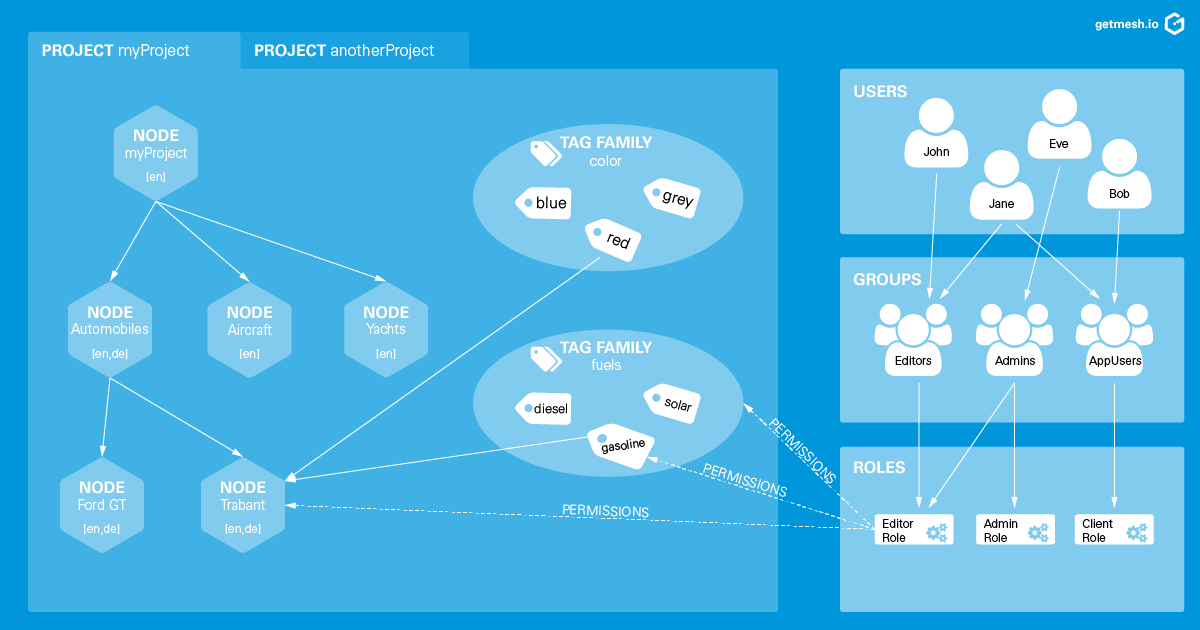
You organize your contents and media assets in projects.
-
A schema is used to define the structure of a content type (e.g. product, blog post). It has a set of standard fields (uuid, name, version etc.) and defines the types of an arbitrary number of custom fields for your content type (i.e. string, number, HTML, date, binary, list, node reference, micronode, boolean).
-
The actual content items of your project are called nodes and always follow a schema.
-
Everything is a node, there is no separate concept for media assets. To get you started, we ship with schemas for image, video, document, and audio that you may customize to your needs and liking!
-
Nodes can be tagged. A tag family groups tags that semantically belong together and is defined for a specific project.
-
Gentics Mesh supports building content trees. Nodes can be hierarchically structured if a container-schema is provided. While it’s possible to organize your contents in a simple, flat structure with tagging and referencing, content trees are the basis for leveraging the power of automatic navigation menus, breadcrumbs, pretty URLs and link resolving. For your convenience, Gentics Mesh is shipped with a generic folder schema that you may choose for hierarchically organizing your content in a tree and ultimately following the well-known file system paradigm.
-
With micronodes it is possible to build complex object data structures as they are basically representing subnodes of nodes. They allow for creating custom content components, e.g. media elements of your blog post such as YouTube videos, image galleries, Google maps, image captions, vcards, quotes, or text paragraphs to be mixed and matched.
-
Supporting multi-language and localisation, nodes can hold several language variants of your content.
-
Each user (a physical person or client app) has a user object counter part in Gentics Mesh, which can be extended by referencing a custom user node. By defining your custom user schema Gentics Mesh supports extensible user profiles for your apps.
-
Groups are used to organize users, e.g., of same access levels.
-
Roles are used to manage permissions between a role and other elements in Gentics Mesh (i.e., nodes, schemas, users, roles, etc.). Roles can be assigned to groups, thus efficiently granting the role’s permissions to a set of users.
Startup
Run Gentics Mesh by executing java -jar mesh-demo-X.X.X.jar
Once the demo setup is completed you will be able to access the following urls
-
Mesh API
http://localhost:8080/api/v2/ -
Mesh UI on
http://localhost:8080/mesh-ui/ -
Demo App on
http://localhost:8080/demo/
Demo Credentials
-
Admin:
admin/admin -
Editor:
editor/editor -
Webclient:
webclient/webclient
Demo
Once the Mesh setup is complete, a demo application will be automatically deployed to the install location under the demohttp://localhost:8080/demo/
The app is composed of static files and can therefore be edited in place. The two JavaScript files which make up the app contain in-line documentation to help you get started.